District Transfer Portal -BTA
Discover the new District Transfer Portal in Navigate360 Behavioral Case Manager, a convenient tool for transferring between different districts easily and efficiently.
- Emergency Management Suite
- Navigate360 Training Institute
- PBIS Rewards
- Suite360
-
Behavioral Threat Assessment Case Manager
Getting Started BTA Webinar Links User Management BTA Feature/Function Overview Behavioral Threat Assessment: CSTAG Behavioral Threat Assessment: NTAC Behavioral Threat Management: Suicide Risk Screening and Management Analytics & Reporting Troubleshooting Release Notes & Updates Click here for BTA Resources / User Guides State Specific Guidance
- Visitor Management
- School Check In
- ALICE Training Institute
- Detect - Social Sentinel
- P3 - Anonymous Tip Reporting
- Resources
- Back-to-School
Whether in response to legislative requirements or to ensure continued support and awareness of students of concern, districts are faced with a need to share cases between one another. Especially between larger districts, it can be difficult to recognize when students transfer and efficiently share accurate, current case information.
Through Case Management’s inter-district transfer portal, districts are able to recognize when students leave their care and their case history may need to follow. Additionally, cases can be shared through the Case Manager portal to ensure receiving teams can understand the context of an individual, evaluate management strategies currently in place, and seamlessly continue supports.
This feature allows districts to share cases between one another. The process detailed in this article is meant to work alongside district-to-district communication, not to supplant it; for example, district stakeholders should contact one-another to alert them to a new student (rather than simply send cases to another district without context).
Both districts must have active subscriptions to Navigate360 Behavioral Case Manager and have the District Transfer Portal activated prior to sending or receiving transfers.
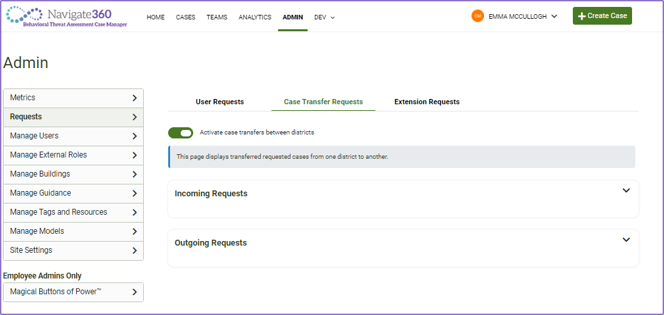
Activating the District Transfer Portal
Users with Manage Cases permissions can toggle on the District Transfer Portal:
We recommend leaving the toggle in the off position when not actively sending or receiving a case.
- Under the Admin menu, go to Requests
- Click the Case Transfer Requests tab
- Toggle on Activate Case Transfers Between Districts in order to allow sending and/or receiving of case transfers
- Transfers can not occur when this is toggled off
Sending a Transfer
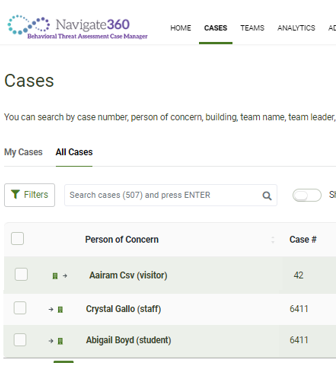
- Click Cases to go to the Case Dashboard.
- Use the search bar to locate the case(s) being transferred. If transferring multiple cases, we recommend searching by student name.
- Check the box next to the case(s) to be transferred.
- Click Bulk Actions, then Transfer to District.
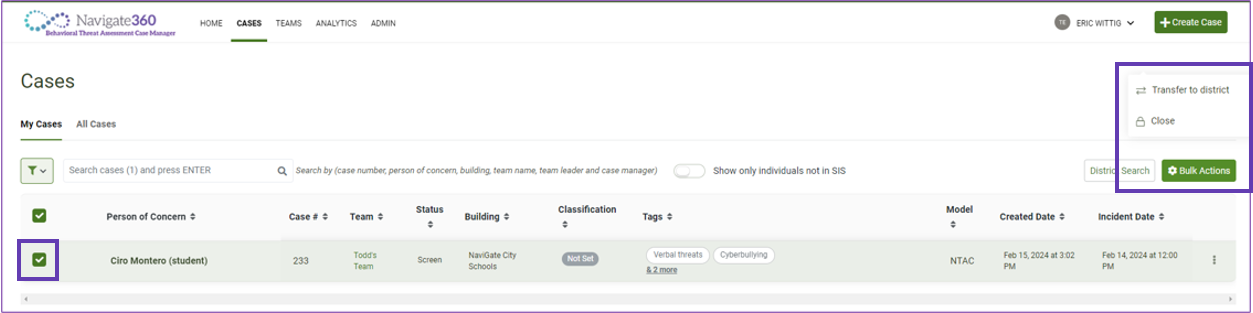
- From the Transfer to District modal, users may select the district they would like to share with and add notes to accompany the case(s).
- Users can cancel transfers after sending them, and can control when the receiving district is able to access them via authentication code.
- After the modal is closed, the option to cancel and the authentication code are available on the Transfer Request List (Admin>Requests>Case Transfer Requests)
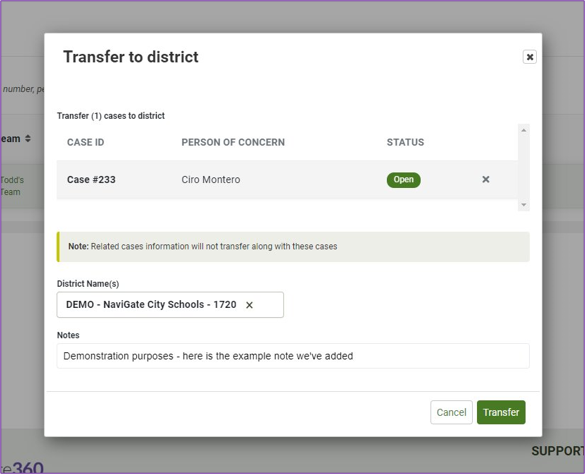
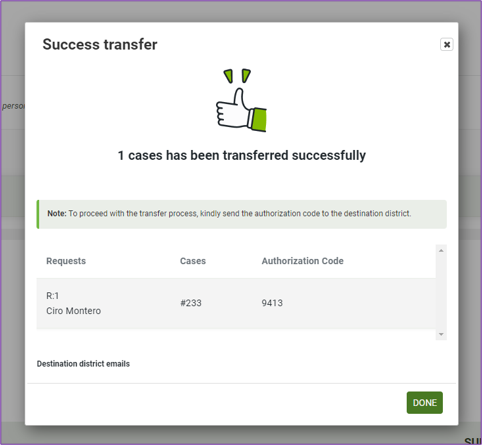
- Once the transfer is populated, the sending district will be able to view an authentication code. This MUST be shared with the receiving district before they are able to access the case(s).
- The receiving district's users with Manage Cases permission will be alerted via email to the pending transfer. They can not complete the acceptance process without the Authorization Code provided by the Sending District.
- Additionally, the pending case transfer will appear within the district's Transfer Request List.
For any sent cases, a copy is retained in the sender's Case Manager as of the time it is sent. Any changes made by the receiving district will NOT affect the original version.
Any cases sent or received will have transfer icons when searched on the Case Dashboard.
Receiving a Transfer
- The receiving district's users with Manage Cases permission will be alerted via email to the pending transfer. The pending case transfer will also appear within the district's Transfer Request List
- Clicking Accept will allow a user to access the case and accept the transfer using the Authorization Code provided by colleagues at the sending district
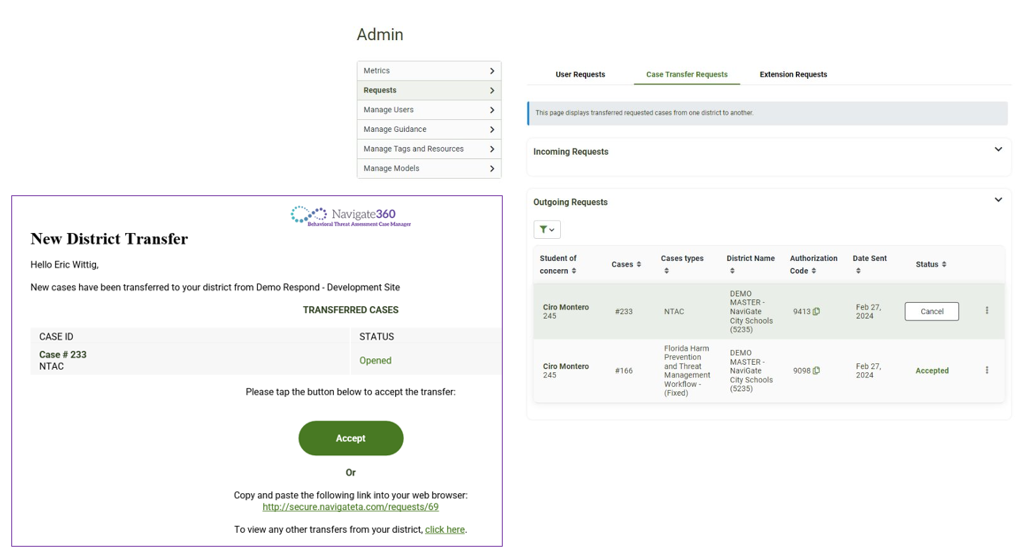
- When accepting a transferred case, users will need to enter the Authorization Code from the sending district
- This code can be viewed in the Transfer Request List by users in the sending district with Manage Cases permission, and must be shared in some way other than Case Manager
-
Acceptance process
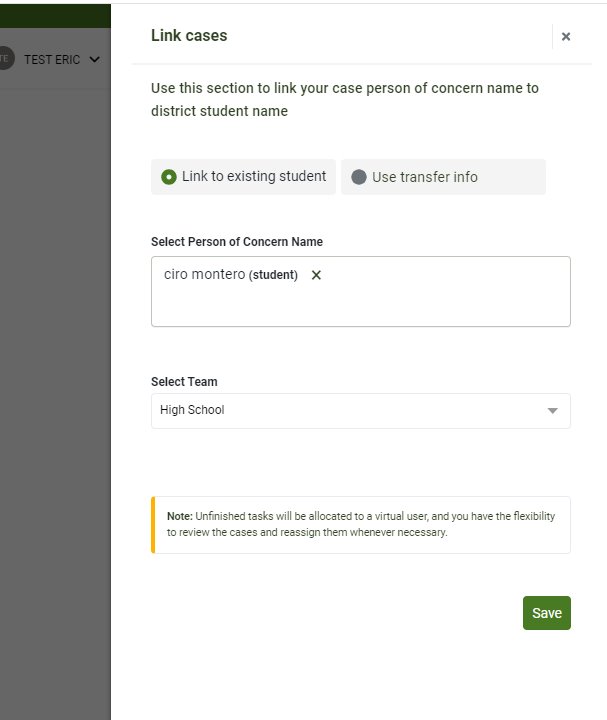
- Connect to Student - Cases can either be associated with a existing student in the Receiving District's SIS or use the transferred case information to generate a new student record.
- Connect to Team - Cases can be assigned to a team in the Receiving District for their review
- Status - Open tasks can be left open to be allocated to team members, or can be closed to allow the team the option of creating their own case and the transfer used as a reference tool
Transfer Requests List
The list can be found under Admin>Requests>Case Transfer Requests
The requests tab displays both sent and received cases, as well as their status and transfer Authorization Code (for cases being sent)
Users can cancel sent cases that are still pending, accept received cases, or reject received cases, as well as view details