DYMO Connect/Windows SSL Connection Troubleshooting- VMS
Troubleshoot SSL connection issues with your DYMO Connect Web Service.
- Emergency Management Suite
- Navigate360 Training Institute
- PBIS Rewards
- Suite360
-
Behavioral Threat Assessment Case Manager
Getting Started BTA Webinar Links User Management BTA Feature/Function Overview Behavioral Threat Assessment: CSTAG Behavioral Threat Assessment: NTAC Behavioral Threat Management: Suicide Risk Screening and Management Analytics & Reporting Troubleshooting Release Notes & Updates Click here for BTA Resources / User Guides State Specific Guidance
- Visitor Management
- School Check In
- ALICE Training Institute
- Detect - Social Sentinel
- P3 - Anonymous Tip Reporting
- Resources
- Back-to-School
If you are receiving a SSL Connection error, or Connection Failed error, when diagnosing the DYMO Connect Web Service, please follow the steps below:
Note: To diagnose the DYMO Connect Web Service: locate the Web Service in your System Tray and right-click on the DYMO icon. Then select "Diagnose..."
- Log into the computer as an Administrator
- Search in the Windows Start menu for: mmc
- Windows Best Match should show “mmc Run command”
- Click on this option to open the Microsoft Management Console

- With the console open, go to File and select Add/Remove Snap-in…

- This will open the Add or Remove Snap-ins window.
- Next, select Certificates and then click Add

- In the Certificates Snap-in wizard:
- Select Computer Account on the first page
- Then leave Local Computer: (the computer this console is running on) selected and click Finish
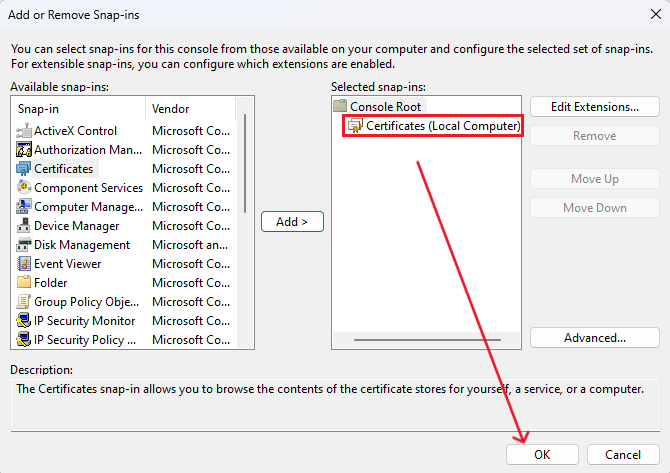
- Verify that Certificates (Local Computer) has been added under the Selected Snap-ins, and click OK to close the window
- You should now see Certificates (Local Computer) listed on the left-hand side of the Console
- From here, you will navigate to the Certificates folder by opening:
- Certificates (Local Computer)
- Personal
- Certificates

- Locate the certificate issued to localhost by DYMO Root CA (for localhost):
- Right-click on the certificate
- Select All Tasks and then click Manage Private Keys…
- This will open the Permissions settings for the DYMO Web Service Certificate
- Here you will need to allow Full Control permissions to the Group or individual Users that will be logged into the computer and printing badges from Visitor Management.
- Select the Group or User you would like to give access to within the Group or user names: list
- If the group/user you are needing to allow is not included on the list, click the Add… button, type in their username or email, click Check Names, and then OK
- Select the Allow checkbox next to Full Control, then click Apply and OK
Note: If there are other users that might need to use Visitor Management on this computer in the future, we recommend giving them Full Control for the certificate as well. That way you don't have to update this certificate regularly.
- After applying the permissions for your users, you can now exit out of the Microsoft Management Console
- You can save this console to have easy access to the certificate, in case you need to apply additional permissions in the future
- You can now have the user log back into their account on the computer
- Verify that DYMO Connect Web Service is running correctly by diagnosing the Web Service.
- You should receive the message: DYMO Connect Service is running on port 41951