How to Use Secure Transfer- PBIS Rewards
Learn how to effectively use Secure Transfer within PBIS Rewards to to pass files, images, and documents to the support team.
- Emergency Management Suite
- Navigate360 Training Institute
- PBIS Rewards
- Suite360
-
Behavioral Threat Assessment Case Manager
Getting Started BTA Webinar Links User Management BTA Feature/Function Overview Behavioral Threat Assessment: CSTAG Behavioral Threat Assessment: NTAC Behavioral Threat Management: Suicide Risk Screening and Management Analytics & Reporting Troubleshooting Release Notes & Updates Click here for BTA Resources / User Guides State Specific Guidance
- Visitor Management
- School Check In
- ALICE Training Institute
- Detect - Social Sentinel
- P3 - Anonymous Tip Reporting
- Resources
- Back-to-School
An Admin in PBIS Rewards will be able to pass files, images, and documents to the support team using Secure Transfer.
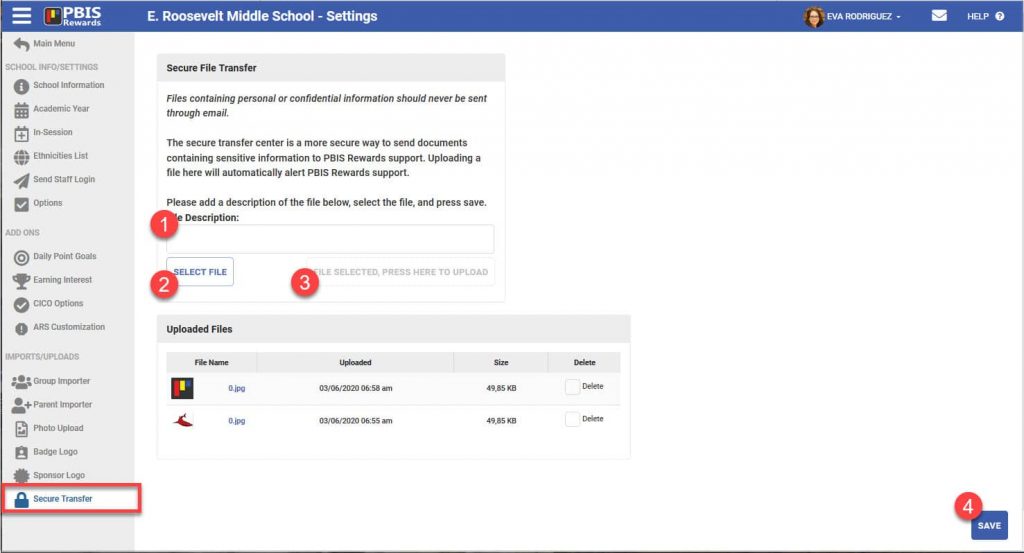
From the left-side Main Menu, select Settings. Choose the “Secure Transfer” tab on the left.
- Provide a short name for the file in the “File Description” field
- Use “Select File” to browse for the file and then select it
- Press the “File Selected, Press Here To Upload” button
- Click “Save” in the lower right-hand corner
This action will create a support case so that a member of the support team can assist.
Files sent to you by PBIS Rewards will be available here as well. You will receive an email to notify you that a file is available.
- Click on the appropriate file name in the “File Name” column of the “Uploaded Files” section
- Choose between opening the file or saving it to your computer when prompted
After you are finished with the file, you can remove it from the “Uploaded Files” section. To do this, check the “Delete” box and select “Save.”
Files containing personal or confidential information should never be sent through email.