Reunification Complete Overview- School Check In
Gain a full understanding of the school check-in process and how the reunification process works.
- Emergency Management
- Connect360
- PBIS Rewards
- Hall Pass
- Preparation & Response Training
- Behavioral Case Manager
- Visitor Management
-
Compass
Getting Started Webinar Links Data & User Management Compass Curriculum for Students, Staff, & Families Compass Behavior Intervention Compass Mental Health + Prevention Compass for Florida - Character Ed, Resiliency, & Prevention Compass for Texas - Character Ed Analytics & Reporting Release Notes & Updates Additional Resources
- School Check In
- ALICE Training Institute
- Detect
- Anonymous Tip Reporting
- Resources
- Back-to-School
Table of Contents
OverviewRequirementsTerms to KnowSetting Up Reunification StaffSetting Up Student Deny Access RestrictionsActivating Emergency Mode (District/School Admins)Claiming Students (Faculty & Staff)Monitoring the Reunification (District/School Admin)Approving Parent/Guardian (Reunification Agent)Completing Reunification (Runner)Reports (District/School Admin)Shut Off/Refresh Reunification (District/School Admin)Overview
This guide will serve as an outline of the Student Reunification Process, for all roles.
Requirements
Set Up: Faculty & Staff/Reunification Agents will need to be imported into the system with email addresses. Reunification Agents will need to be assigned, as described in the set up below. District Admin and School Admins will already have instant access to the Reunification Module. Deny Access Restrictions set up for Students, as shown below.
Emergency/Drill: A District Admin or School Admin will need to put the school(s) in Emergency mode. Faculty & Staff will need to have access to a computer/smart device that has WiFi/Cell Data access. Reunification Agents will need to have access to a computer/smart device that has WiFi/Cell Data access and an internal/external camera.
Terms to Know
School Check IN District Admin – This user has access to all schools on www.schoolcheckin.net. This user has the ability to turn on Emergency Mode, Claim Students, Approve Parent Reunification, Monitor Reunification and run Reports for all schools.
School Check IN School Admin - This user has access to their current school on www.schoolcheckin.net. This user has the ability to turn on Emergency Mode, Claim Students, Approve Parent Reunification, Monitor Reunification and run Reports for their current school.
Faculty & Staff - This user has access to https://www.schoolcheckin.net/emergencylogin.aspx and can claim children at the rally points.
Reunification Agent – This user has access to https://www.schoolcheckin.net/emergencylogin.aspx and can verify Parent/Guardians for Reunification. This group will work the Parent/Guardian Reunification Table.
Runner – This adult will be assigned to obtain students, after the Reunification agent has approved the Parent/Guardian Reunification.
Unlinked - Refers to Students, that are not linked to a parent record in School Check IN.
Linked - Refers to Students, that are linked to a parent record in School Check IN.
Deny Access List (DAL) – Parents/Guardians that are placed on this list are not able to pick up students associated to this DAL record.
Setting Up Reunification Staff
Step 1 Ensure that Faculty & Staff and Reunification Agents have been imported into www.schoolcheckin.net with the required fields and an email address.
Faculty & Staff will not need any additional set up. Reunification Agents will need to be assigned as so, in the proceeding steps.
Step 2 Navigate to the Emergency Management button
Step 3 Click on the Reunification Agents Button
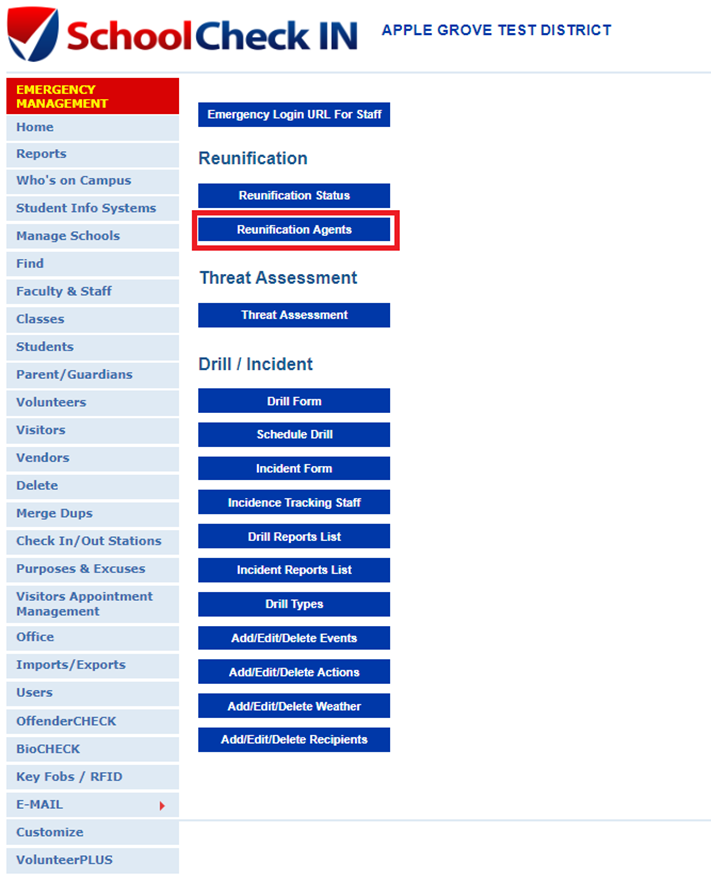
Step 4. Select the check boxes next to the Faculty and Staff that will be part of the Reunification Team.

Step 5. Select the Save Changes button to move the selected Faculty and Staff to the Approved Reunification Staff list.

Approved Reunification Agents can now access the Emergency Management portal shown in the steps below, to start Reunifying Students.
Setting Up Student Deny Access Restrictions
Unlinked:
Step 1. Click on the Student button
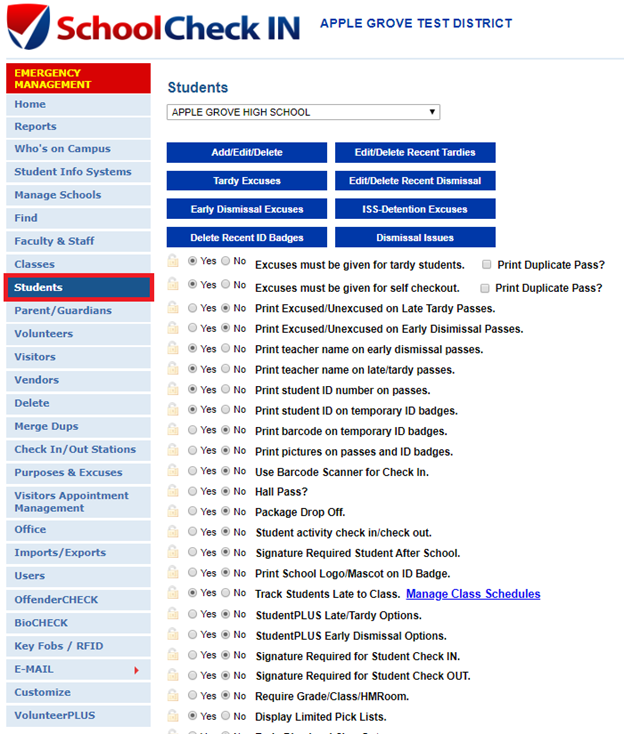
Step 2. Click on Dismissal Issues button
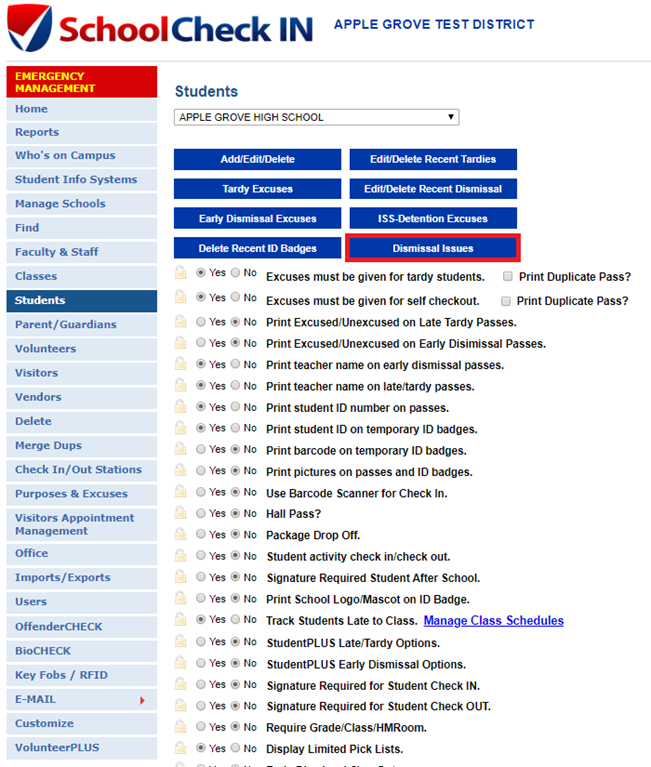
Step 3. Fill in Student ID#, Adult First/Last Name and supporting court documents

Step 4. Click Save

Clicking the Uncheck Dismissal Issue button will remove this record.
These restrictions will be used when the Reunification Agent is checking in a Parent/Guardian at the Reunification Table. This will ensure that the Parent/Guardian that is picking up the student, is approved to do so. Any student with a Deny Access List Restriction will appear with a  .
.
Linked:
Step 1. Click on the OffenderCheck Button on schoolcheckin.net
Step 2. Click on Deny Access List
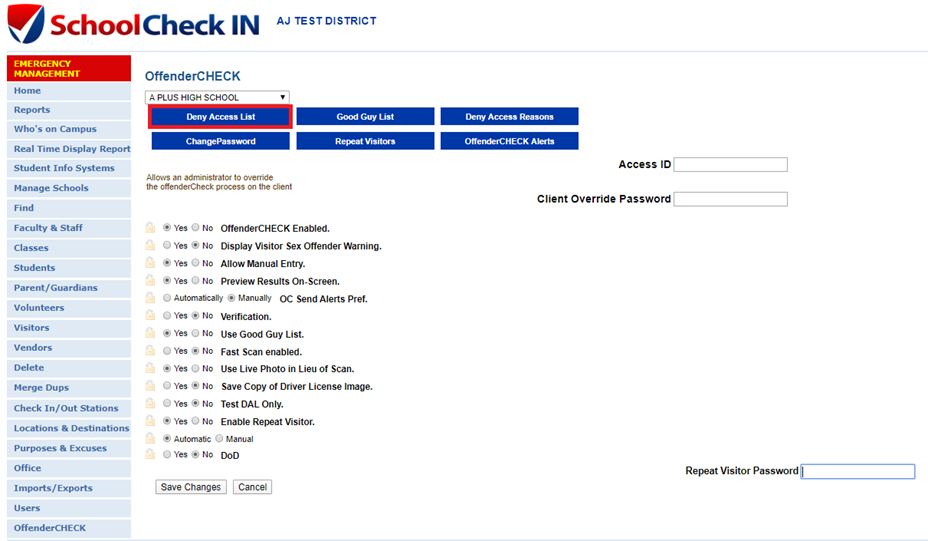
Step 3. Click on Deny Access Entry

Step 4. Fill in Required (*) Info
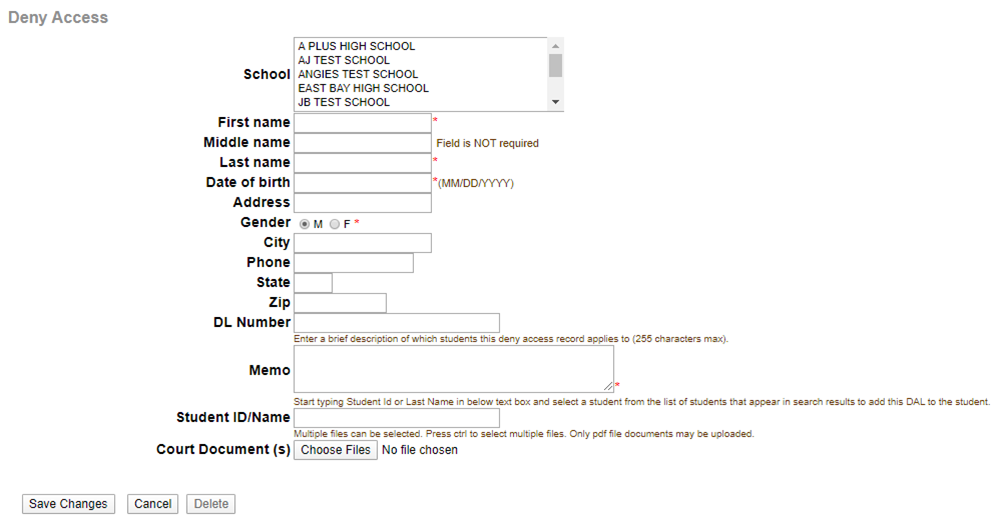
Step 5. Start typing in the Last Name or Student ID# in the Student ID/Name Field
Step 6. Select the Student(s) that should not be picked up by this Adult

Step 7. Click on Choose Files to attach any supporting Documents on why this Adult is banned from picking up the student(s).
 Step 8. Click on Save Changes
These restrictions will be used when the Reunification Agent is checking in a Parent/Guardian at the Reunification Table. This will ensure that the Parent/Guardian that is picking up the student, is approved to do so. Any student with a Deny Access List Restriction will appear with a  .
.
Activating Emergency Mode (District/School Admins)
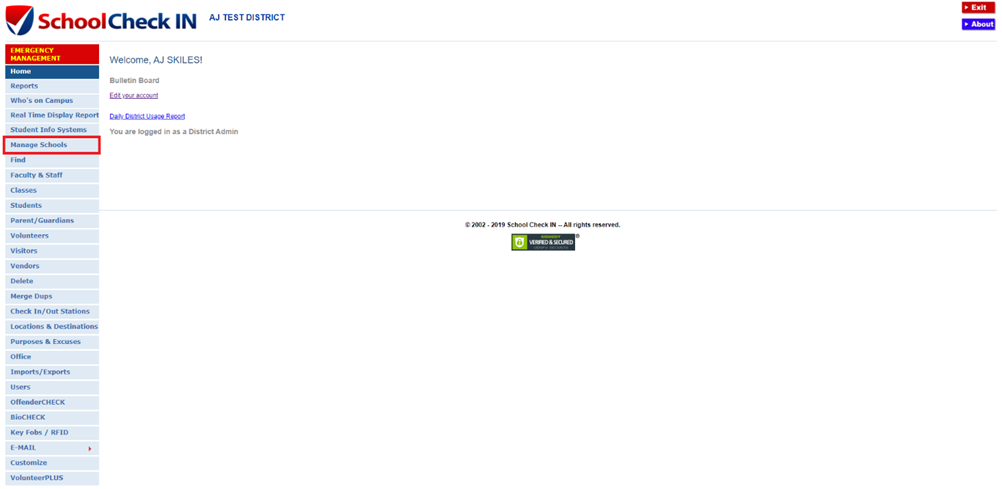
Step 1. The District Admin or School Admin logs into www.schoolcheckin.net
Step 2. Click on the Manage Schools button
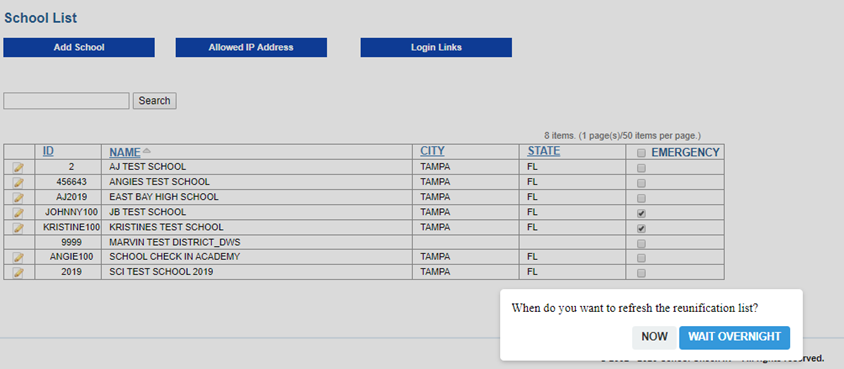
Step 3. Click on the check box under the Emergency column
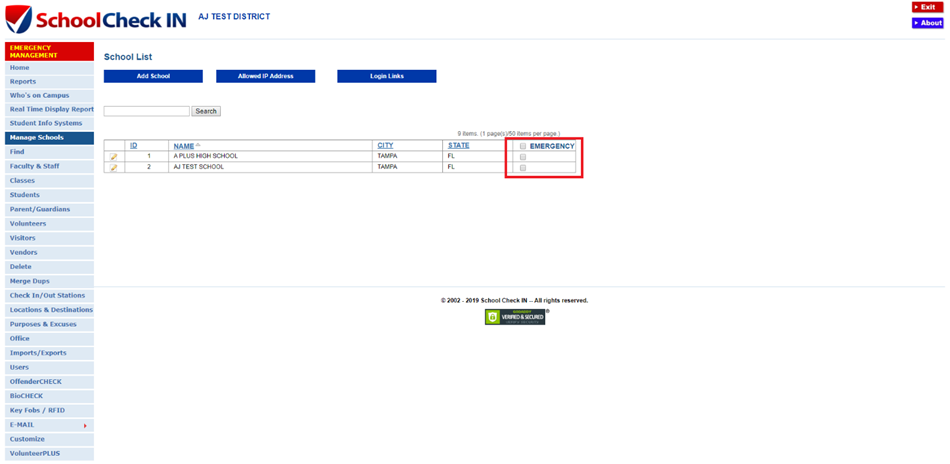
Step 4. Click OK on the confirmation pop up

The school(s) will now be placed in Emergency Mode. With Emergency Mode turned on, Faculty & Staff/Reunification Agents will have access to the Reunification module located on https://www.schoolcheckin.net/emergencylogin.aspx
Claiming Students (Faculty & Staff)
Step 1. Sign into https://www.schoolcheckin.net/emergencylogin.aspx
Step 2. Enter username (email) and password (last 4 digits of employee id#).
Click Check IN.
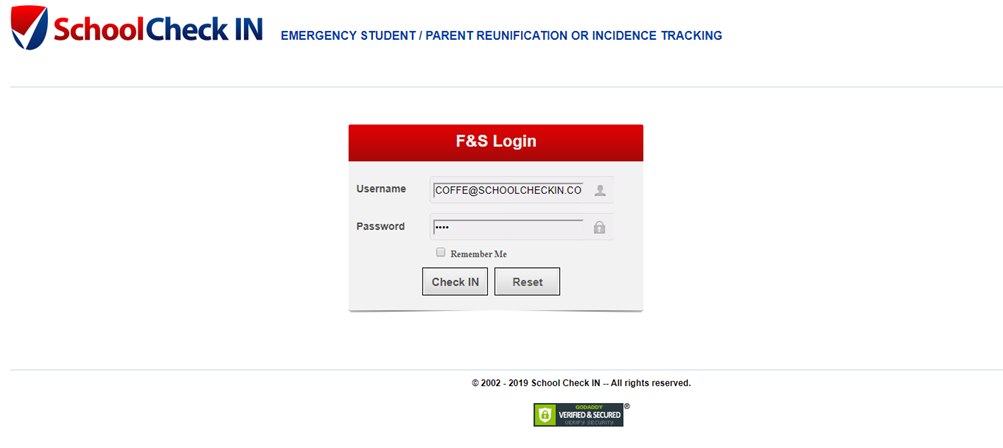
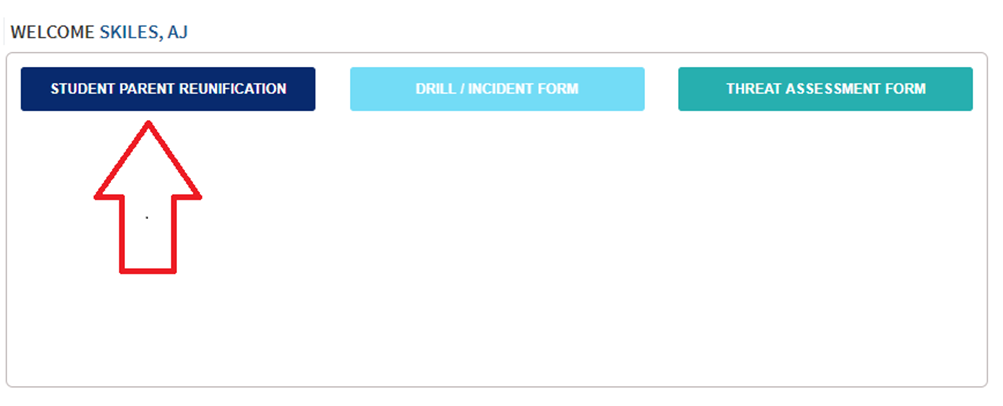
Step 3. Once logged in, click on the Student Reunification button
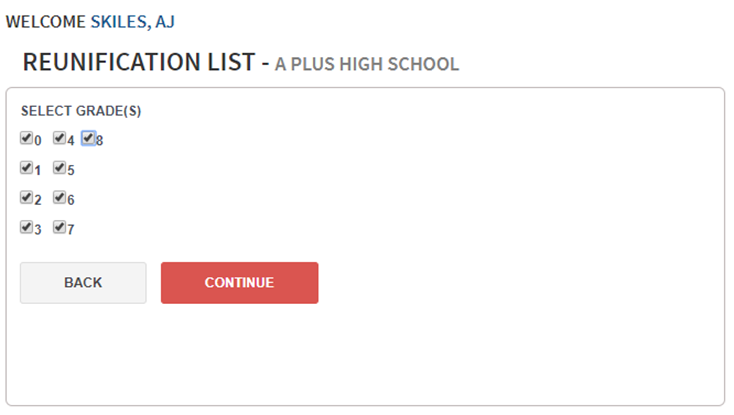
Step 4. Select the check boxes for the Grade/Classes of the students in your possession and click Continue
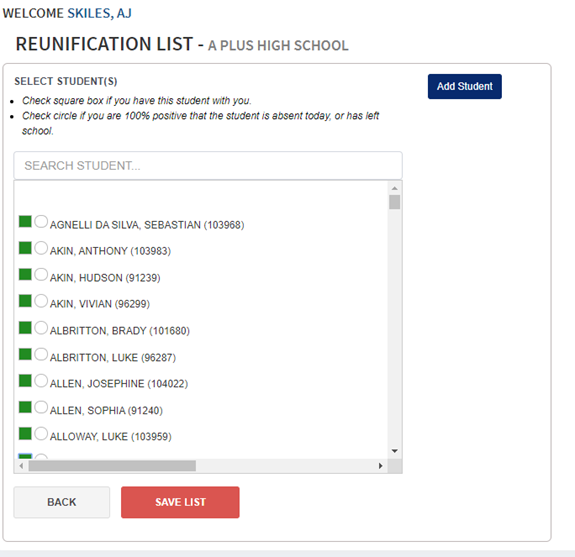
Step 5. A list of all students, contained within the Grade/Classes, that were selected, will appear. The staff member can go through the list and select:
- The Square, if the student is currently in their possession
- The Circle if they are 100% that the student is absent or has dismissed early.
- Leave blank if student is not with you and you are not 100% they have left the school
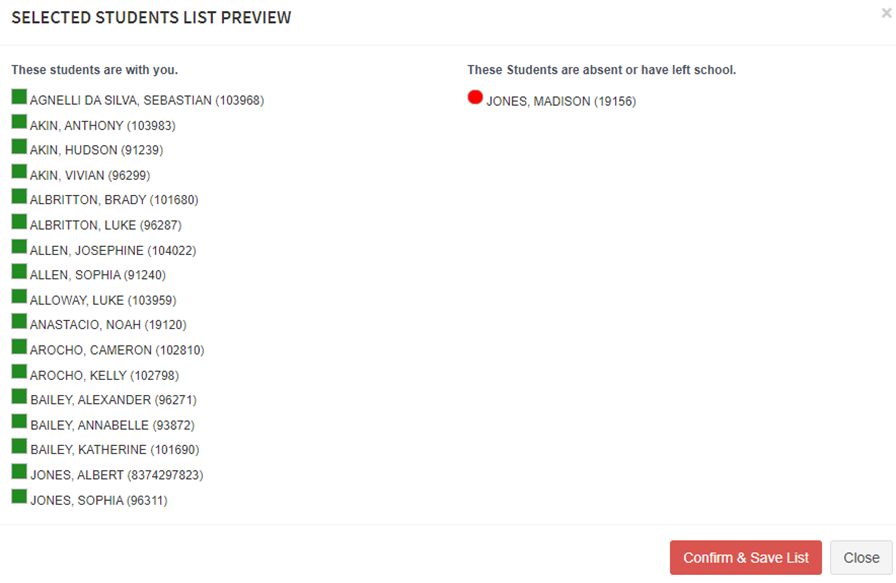
Step 6. Once all students in your possession and absence students have been accounted for, click on Confirm & Save List button
Step 7. A summary table will be displayed. The Faculty & Staff will have the ability to edit this list, if more students come into their possession, by clicking on the Edit List Button.
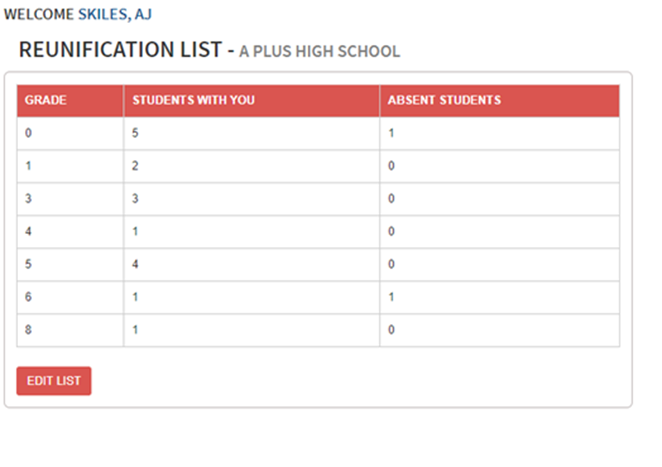
This information will now be communicated to the Parent and Guardian Registration table. This information will be updated on the Live Reunification Status screen, allowing the District/School admins to send a runner to the correct Faculty & Staff member, to complete the Reunification Process.
Monitoring the Reunification (District/School Admin)
Step 1. District/School Admin will log into www.schoolcheckin.net
Step 2. Click on the red Emergency Management button
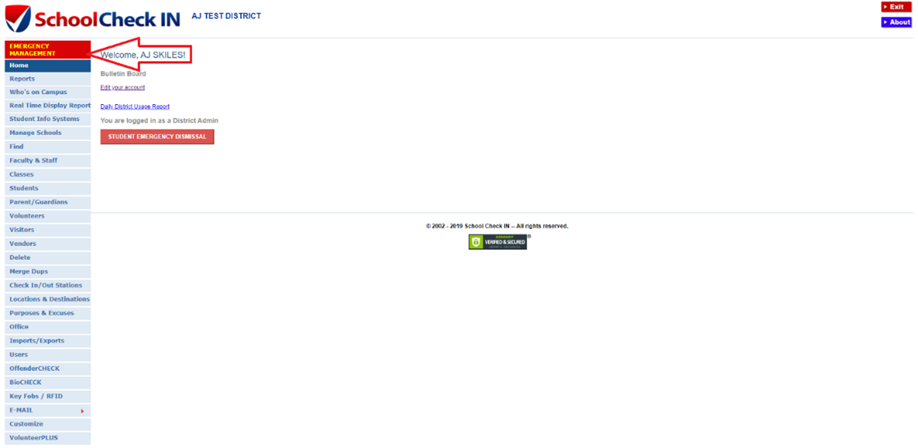
Step 3. Click on Reunification Status button
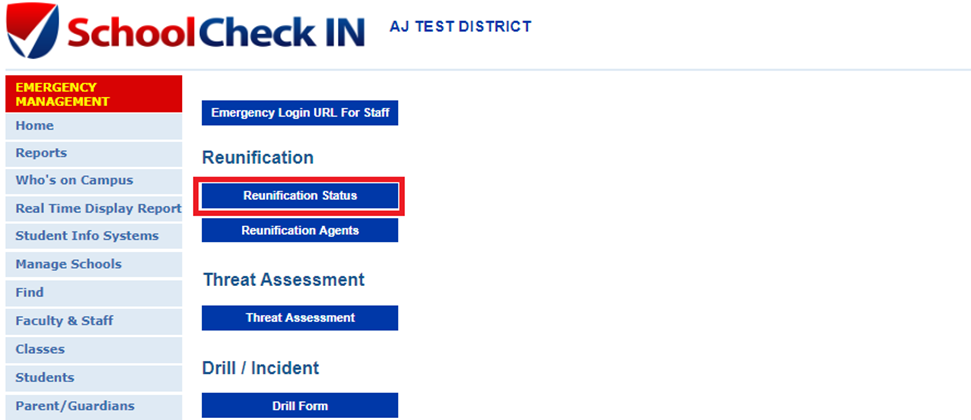
The District/School Admin will be presented with a real time updating table. As the Reunification proceeds, the Student’s status will update as they are claimed and released to their Parent/Guardians. The default table view will be Claimed.
This table can be filtered by Status, Grade/Class and Claimed by. It will show the students first name, last name, grade/class, claimed by, reunification date & time, reunified by and reunified to. The default table view will be Claimed.
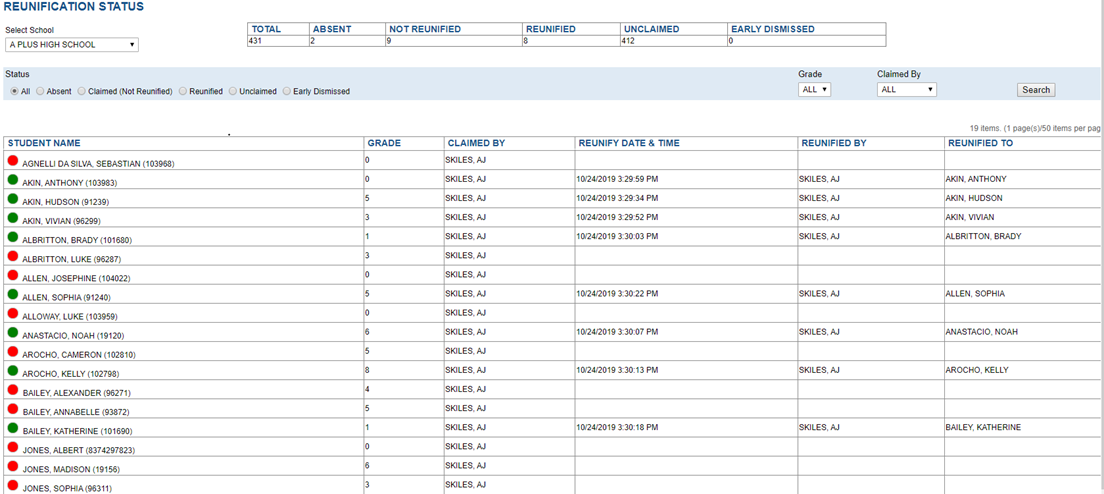
Key:
All – Shows all students under the selected school
Absent – Shows students that have been marked by an Admin/Staff Member as being absent for the day
Claimed (Not Reunified) – Shows students that are currently in the possession of an Admin/Staff Member, but have not been reunified with their parent/guardian.
Reunified – Shows students that have been successfully reunified with their parent/guardian. A green dot will also appear next to the student name.
Unclaimed – Shows students that have not been claimed by an Admin/Staff Member
Early Dismissal – Shows students that have been early dismissed by School Check IN, for that day.
Approving Parent/Guardian (Reunification Agent)
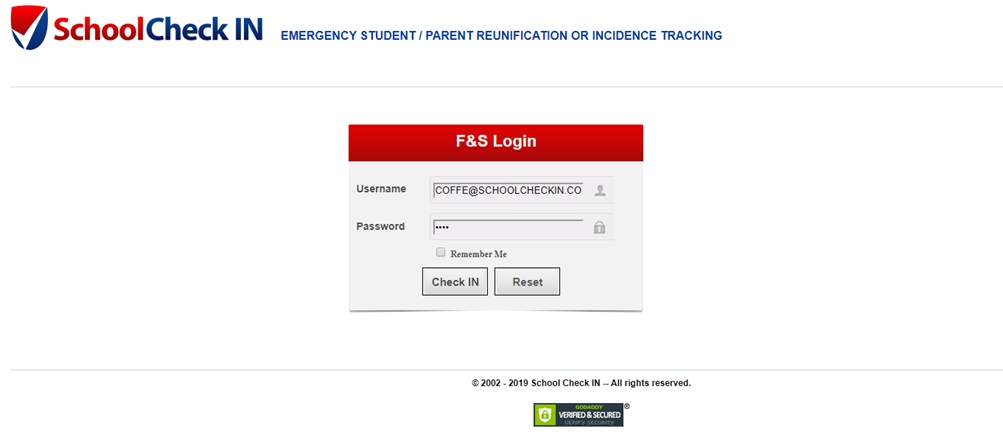
Step 1. Sign into https://www.schoolcheckin.net/emergencylogin.aspx
Step 2. Enter username (email) and password (last 4 digits of employee id#).
Click Check IN.
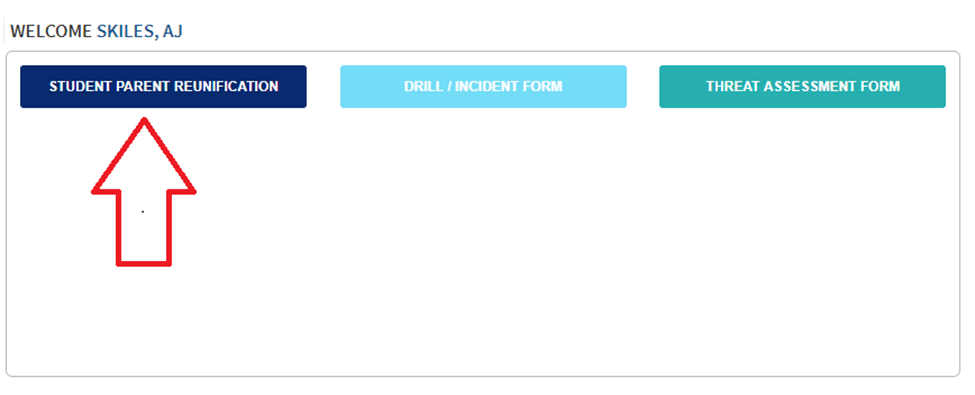
Step 3. Once logged in, click on the Student Reunification button
Step 4. Select Student Name from drop down list
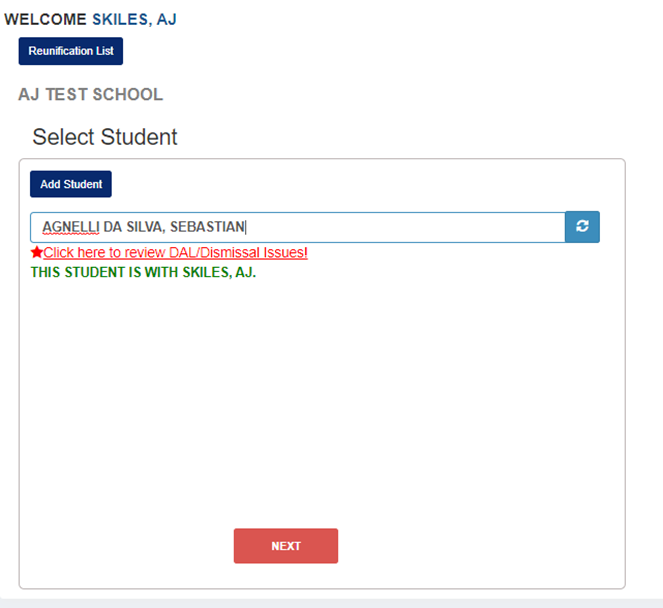
Step 5. Verify if the Student has any Deny Access Restrictions
If a Student has had a Deny Access Restriction placed on them, due being associated to a Parent/Guardian that has been added to the School Check IN Deny Access list, a  will appear next to their name. The Reunification Agent will be able to click on the
  to review the restriction.
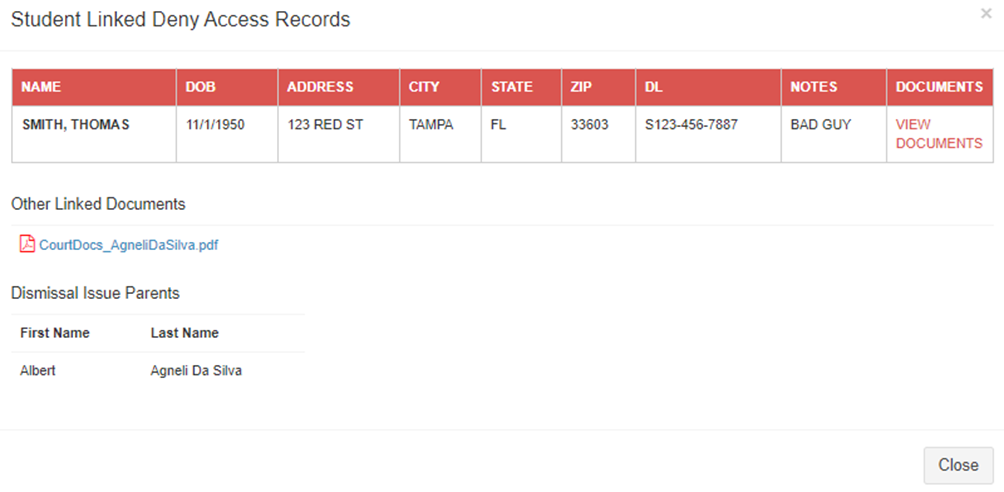
Thomas Smith was added through the Deny Access List. Albert Agneli Da Silva was added through the Student Dismissal Issues button. Please refer to the set up above for the distinction between the two.
Clicking on the View Documents link, will bring the Reunification Agent to a portal with the supporting documents:
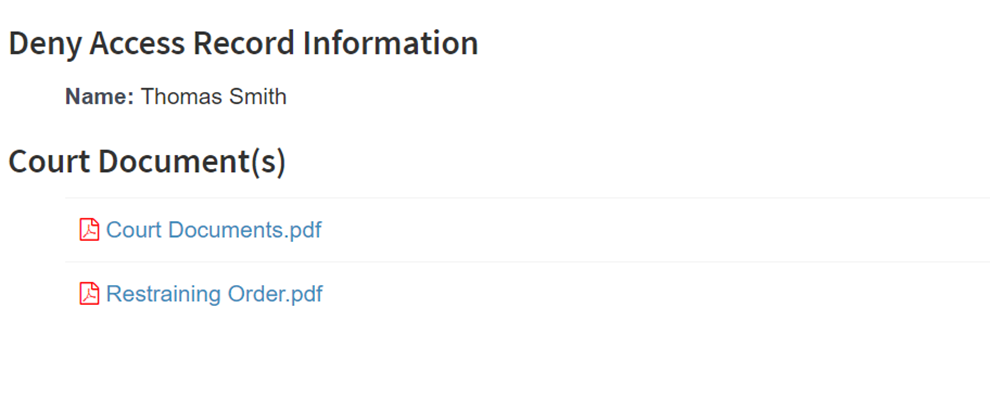
If a match is found, the Reunification Agent should follow their districts procedure on moving forward. If no match is found, the Reunification Agent can proceed forward to Step 6.
Step 6. Verify what Faculty & Staff member has claimed that Student, so the designated Runner can accurately locate the student, to complete the Reunification.
Step 7. Click Next
Step 8. The following screen will prompt for the Reunification Agent to capture a photo of the Parent. The admin will use the Snap Photo button to capture the image and then click Next to proceed forward.
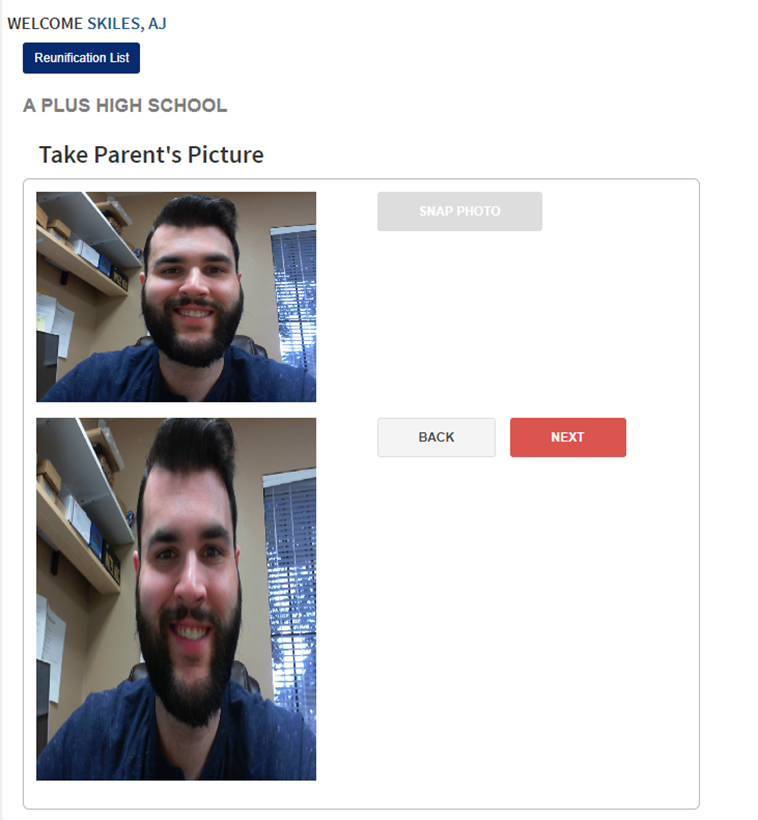
Step 9. The following screen will prompt for the staff member to capture a photo of the Parent’s Driver License. The admin will use the Snap Photo button to capture the image and then click Next to proceed forward.
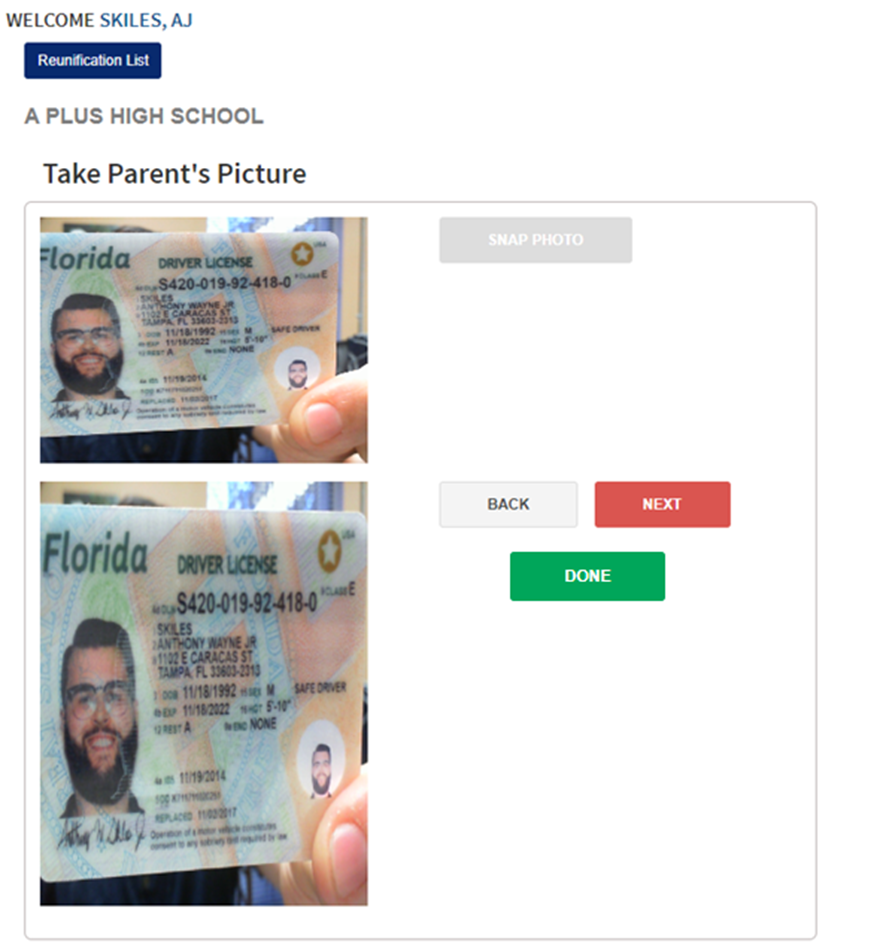
Both the Parent’s picture and Parents’ Driver license can be accessed on a report at a later time.
Step 10. Click Done
Step 11. The Reunification Agent will now be prompted to:
Dismiss Another Student to the Same Adult – This will proceed to the student list. Once a new Student name is selected and the Reunification Agent clicks done, the reunification will automatically be completed. The previous images taken, will also be used for this reunification. This process can continue until the Reunification Agent selects New Dismissal.
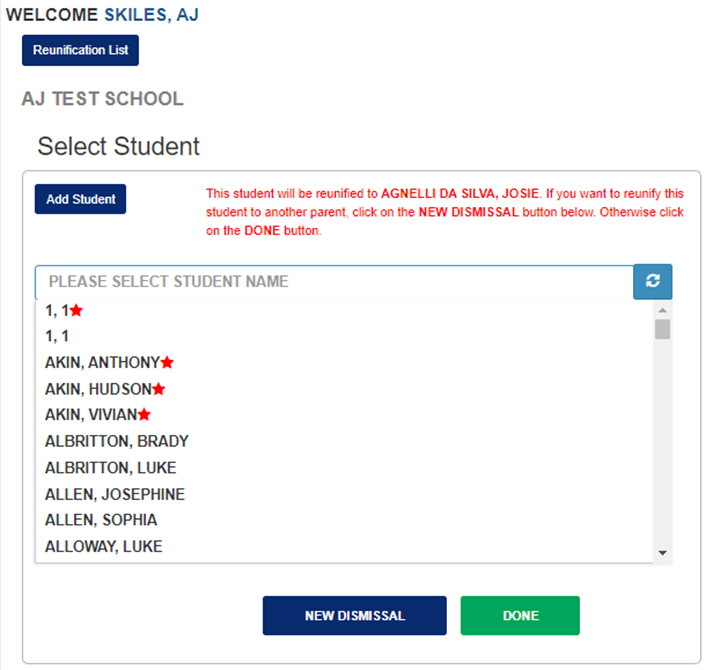
New Dismissal – The Reunification Agent will be taken back to the Student list and proceed with steps 4 – 11 again.
Completing Reunification (Runner)
Once all steps have been completed, the Runner will have the go-ahead to obtain the student and reunify them with the approved Parent/Guardian.
Reports (District/School Admin)
School Check IN offers three (3) different reports that can display data for the Reunification.
Emergency Student Reunification – Shows students that were successfully reunified. Includes student’s name, grade/class, date, time, dismissed by, parent/guardian name, parent’s photo and parent’s id photo. This report can be run with any date period.
Emergency Students Dismissed – Shows students that were reunified for the current day. Includes students name, student id#, time and grade/class.
Emergency Students Not Dismissed - Shows students that were not reunified for the current day. Includes students name, student id# and grade/class.
Shut Off/Refresh Reunification (District/School Admin)
Step 1. Navigate to www.schoolcheckin.net (Sign in as District/School Admin)
Step 2. Click on Manage Schools
Step 3. Uncheck the Emergency box
Step 4. Confirm that you want emergency mode off
Step 5. Admin will be prompted with the following options:
Now: Refreshes all Reunification data, including Reunification Table immediately. This is good after a drill has been done.
Wait Overnight: Refreshes all Reunification data, including Reunification Table overnight.
